
Monday, January 31, 2005
Beer!

I got this idea from the current (Feb/March) issue of "The Stampers' Sampler". They did a spread on Andy Warhol-ish work. The original image from the magazine can be seen HERE (will open in a separate browser window).
This is just SO easy to do, and so very cool. Just stamp the image on whatever colors of cardstock you want...I used black pigment ink and clear embossing powder to heat-emboss them all. The original artist in Stampers' Sampler used the Fiskars Shape Cutter to cut out part of some of the stamped images, and so did I. Just line up the cut-out parts to the whole images, glue into place, cut into squares, and adhere to the card.
I did a series of cards based on this idea. If you would like to see them, they are HERE, on my personal stamping site.
Saturday, January 29, 2005
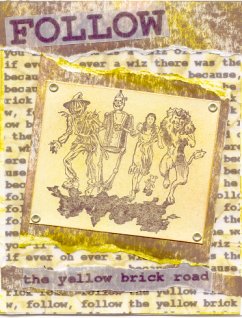
I like the Wizard of Oz...
...I like the Tin Man! :-)
Click image for bigger...will open in separate browser window.
This is my second effort using Tim Holtz' Distress Inks™. The "Wizard of Oz" stamp (Stamping Ground) is based on illustrations from the original books, so I thought it was a good choice for the vintage look that the inks provide. The actual card is not as yellowy as this scanned-in image is.
First I cut some cream-colored cardstock to the size of the front of a plain card. I distressed it using the crumpled paper technique, as described in this post, using the Distress Ink in Mustard Seed. This was attached to the front of the card.
I distressed some of the same cream cardstock by just rubbing the inkpads onto the paper...I used several colors here...Walnut Stain, Tea Dye, Vintage Photo and Mustard Seed. These were torn to use as backing for the image and the main text. I think the effect is cooler if you tear the paper towards you rather than away, as the un-inked layer underneath will be exposed.
The "Wizard of Oz" people were stamped onto cream cardstock with the Walnut Stain ink, and then I used a color duster to apply a little Mustard Seed and Vintage Photo inks. This was mounted onto the distressed backing as shown. "FOLLOW the yellow brick road" was computer-generated onto vellum and stuck to the other distressed backings.
Before I attached it all together, I just laid the pices onto the card and thought that it needed something more. I liked the idea of background text, so I typed out the words to "We're Off To See The Wizard/Follow The Yellow Brick Road", copied and pasted to repeat, and printed it onto a sheet of vellum larger than the card. I then cut it to the size of the card and used a Xyron® machine to attach it to the distressed yellow card. All of the other stuff was then attached, ending with the inage, where I used gold eyelets as both an attaching means and an embellishment.
BTW, I bought that stamp a long time ago, when I first started stamping. This is the first time that I have used it. I always say that if you see a stamp that you really love ("The Wizard of Oz" is my favorite movie), buy it, even if you have no immediate use for it. Someday you WILL use it! :-)
Tuesday, January 25, 2005
Technicolor kitties!

Click on image for bigger, will open in a separate window.
Lots of birthdays coming up, which means lots of card making! A stamper's work is never done! :-)
This card was easy to make and only required two stamps...the kitty (Catslife Press), and "happy birthday" (from the "Spunky Greetings" set by Close To My Heart®).
First, I brayered red, yellow and blue ink onto the front of a white card. I stamped the kitty in six different colors onto white cardstock, trimmed, and then made mats our of the same colors. This was done by either brayering or just applying the stamp pad directly to the white cardstock. I stamped "happy birthday" in red and matted that the same color as well. I then cut a white panel a little smaller than the card, and randomly stamped "happy birthday" in all six of the colors.
Everything was glued together as you can see here, and a finishing touch was the two red eyelets.
That kitty stamp looks so much like my Little Mitty! As soon as I saw it at the store, I had to have it.
Sunday, January 23, 2005
I'm A Damsel in Distress!

I've been watching that Tim Holtz DVD a lot lately, and I had already bought a few colors of his Distress Inks...right now I have Walnut Stain, Tea Dye, and Vintage Photo. Finally, I decided to try some of his techniques for using these inks, and you're looking at my first effort! I used Walnut Stain for this card.
First, I made a card from cream-colored cardstock, and cut it to fit a 5 1/4" x 7 1/8 clear envelope. The card needs to be cut slightly smaller, because it gets thicker with all of the layers, and you want to make sure that it will fit into the envelope!
I cut another piece of the same color cardstock a little bigger than the front of the card. To distress it, Tim says to first slightly bend the cardstock, and sort of pinch it *to break the tension*. Then it will be much easier to crumple it in your hand.
I didn't have the non-stick craft thingy that Tim used, but I did have parchment paper, the type used for cooking and baking. It's nonstick and can take the heat, and you can buy it at the supermarket. So I uncrumpled the cardstock, put it on the parchment, and spritzed it with water (in this house, we call it The Squirt Bottle of Justice™ , and it serves double duty by keeping naughty kitties off of the craft table!).
Then, I ironed it. Although my policy on clothing is that if I have to iron it, I don't wear it, I DO own an iron with a nonstick surface. I dug it out just for this project. Tim used a smaller *craft iron*, but advised that if you do use a regular iron, make sure to clean it before using it on your clothes. I set my iron for a low setting (mine was set halfway between Silk/Rayon and Permanent Press), and no steam is needed...the paper is already wet enough.
Once this distressed cardstock was ironed and dry, it was cut to the exact size of the front of the card, and adhered to it.
On more of the same cream cardstock, I stamped the baseball player (Stampin' Up!®) and the baseball collage stamp (Paper Inspirations™), with the Walnut Stain. Tim uses a stipple brush over the image after stamping to help create an aged effect, but I don't have one, and was not about to go to the craft store to get one, what with three feet of snow on the ground. A makeup sponge, such as those wedge-shaped ones, works just as well. The stamped images were then cut/torn as you can see here.
The tag was cut out of the cream cardstock, using the Fiskars Shape Cutter & a tag template. The mat behind the baseball player was also from the same cardstock. To *distress* these, I just rubbed the ink pad directly to the paper...no crumpling or ironing needed for this part.
Finishing touches: two corners made from the same distressed cardstock as the tag...some gold brads and some tan-colored hemp (both from Close To My Heart®). The text was computer-generated onto vellum and attached with a Xyron® machine. In fact, just about everything was attached with a Xyron® machine!
The text is part of the lyrics to one of my favorite songs, "Centerfield", by John Fogerty.
This was fun, and now I want to buy all of the colors of this cool ink! :-)
Friday, January 21, 2005
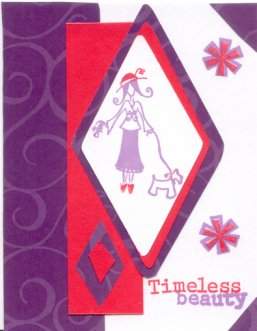
Red Hat Stuph


Click each image for larger, will open in separate browser windows.
This is all part of my gift for my Red Hat Society® chapter's holiday party, which takes place tomorrow. It is going to be a basic rubber stamping kit. This card, the other RHS card in the post below this one, and the bookmark are intended to be samples that the recipient can get ideas from. I am also including a few items purchased especially for this...a RHS rubber stamp, red & purple markers, and a couple of stamp pads. Finally, there will be a small selection of papers, cardstocks and ribbon from my vast personal stash, as well as a hand-made instruction booklet.
The card here started with plain white cardstock, the striped paper (Designs By Reminisce, an excellent source of Red Hat Society scrapbooking supplies) was cut to size, torn, and adhered to the card. "Uptown Girl" (Close To My Heart®) was stamped onto white cardstock, as in the previous card, and was cut into a circle and matted onto a red and then a purple circle. I didn't have any pirple cardstock, so I just applied ink directly from a stamp pad onto the largest white circle. Finally, I stamped "for you" (also from Close To My Heart®).
The easiest way to make a bookmark is to go to a craft store and buy pre-cut plain bookmarks which you can decorate. But I found myself with a strip of the striped paper that was about the right size. I adhered this to a piece of white cardstock, to give it extra strength, and trimmed it to shape. I stamped the hats on more white cardstock, cut that to size, and matted it onto a scrap of purple paper. This was then glued onto the striped bookmark. I punched out two small red circles, and attached one to either side of the top of the bookmark, to provide extra strength to the hole that I then punched into that.
For the tassel, I cut 5-6 strands of red yarn into about 12-inch lengths. I only had red yarn, but if I'd had any purple, I would have used some of that, too. Take all the strands, put them together, and make a loop. Stick the looped end into the hole so that it sticks out by maybe 1/2 inch or so. Thread all of the non-looped ends through this, and pull. Finally, finish by making a knot near the non-looped ends. You can also buy pre-made tassels, but this is less expensive, especially if you knit or crochet and have a lot of odds and ends of yarn laying around.
If you have a Xyron® machine with a lamination refill, you can certainly laminate the bookmark before punching the hole and attaching the tassel. But I am assuming that the recipient of this gift does not have one, so I didn't bother with that step.
To make the box...I took a recycled box with a flip-top lid. This box orignally contained a Christmas gift from Marsha...thanks, Marsha (for the gifts and for the box)! It's about the size of a cigar box, but a little deeper.
I only covered the top, as the rest of it is just plain white. I used a template to cut out a white tag, stamped it with the hat and the letters, and used the edge of a red stamp pad to color it around the edges. Finishing touches were a couple of red star-shaped eyelets and some red & purple ribbon.
I hope that whoever ends up getting this will enjoy using it, as much as I enjoyed making it! :-)
Wednesday, January 19, 2005
Red Hat Card
This card is a part of the Yankee Swap gift for my Red Hat Society® chapter. The gift consists of an RHS-related rubber stamp, some paper and cardstock from my personal stash, a couple of stamp pads and red & purple brush markers. There will also be a handmade instruction booklet to give the recipient some ideas as to how to use this stuff!
All of the stamps used here, as well as the purple paper, are from Close To My Heart®.
The effect of more than one color on a single stamp can be accomplished in two ways. You can use brush markers to ink the stamp, which gives you more control as to where the colors go. Or, you can carefully dab the colors onto the stamp, using just the corner of a stamp pad. Test this out on cheap paper first, before applying to your more expensive cardstock!
Here, I used the ColorBox Fluid Chalk inkpads from Clearsnap. Last week, I was at a stamp/scrapbook store, and they had tons of these in *cat's eye* sizes...little pads shaped like a cat's eye. These only cost two bucks apiece, and are easy to use when inking only part of a stamp. I picked up a bunch of these when I was there, and used a couple for this project.
I am hooked on these ink pads, and want to get the cat's eye ones in all of the colors. I have already bought a few of my very favorite colors in full-sized pads! :-)
Friday, January 14, 2005
Thank You Cards!

Click HERE for larger image, with inside of card...will open in separate browser window.
This is the thank-you card that will be sent to all who gave me Christmas gifts. It looks better in real-life than it does as a scanned-in image. I got the general inspiration for this from a stamping magazine called The Stamper's Sampler. The artist had used stamp pad inks and papers that were the same colors, such as what is offered by Close To My Heart® and Stampin' Up!®.
But I didn't have all of these matching inks and papers, at least not enough to make as many cards as I needed. But I had plenty of white cardstock, stamp pad inks, and a rubber brayer.
I decided on two ink colors...Indian Corn Blue and Autumn Terra Cotta, both from Close To My Heart®. I had some pre-made white cards that were a bit larger than what I needed, and I inked the brayer with the blue ink, and rolled it a few times, over the front of the card only. The inside and back remained white, as I wanted it to be. The color will NOT be even, but I think it gives the card an interesting look. The reason that I did not trim my cards to size before brayering was that I had plans for those scraps! After the ink dried (doesn't take long), I trimmed the cards to to size, and reserved all of the scraps.
I then took a few sheets of white cardstock, and use both of the colors to stamp them randomly. The stamps used for this background are from Close To My Heart®...from the "Funky Chunky" and "Funky Confetti" sets. Some of these were stamped twice before re-inking, to create a slightly lighter image.
This stamped cardstock was then cut to size and mounted onto the cards.
I used some of the leftover blue and white card scraps to make the "time to say" thingy. The "Storytime Lowercase" alphabet set from Close To My Heart® was used here.
I then cut the diamonds out, using a Fiskars ShapeTemplate™...the diamond shaped one, of course! The larger diamonds were cut from regular white cardstock, and brayered over in the blue and terra-cotta colors. The smaller ones were cut from glossy cardstock, and stamped with the Kit-Cat Klock stamp (from Stamp Francisco™).
I attached small diamonds to large diamonds to make these *tags*. Then I punched out co-ordinating circles, and attached them to the same color tags with white eyelets. I then made little *ribbons* from the same colored scraps, threaded them through the eyelets, ran the tags through a Xyron® machine, and stuck these onto the card, along with the "time to say" thingies.
For the inside, I stamped "Thank You!" (Posh Impressions®) several times without re-inking the stamp. I then added "thanks" (from "Spunky Greetings" set, Close To My Heart®).
I think this is a good lesson in *using what you have* to make a card seen in a magazine, rather than running out to the store and spending money.
But if you do not have a rubber brayer, it's worth it to get one. This has so many uses, and is easy to clean. I just run mine under warm water, dry it off, and it is ready for the next color! Just be sure to use something to protect your work surface, as brayering can get messy!
BTW...I own one of those Kit-Cat Klocks! You, too can have one! So cute!
Wednesday, January 12, 2005
Hand-Stamped Jewelry Part 2
Christine asked me to explain about the jewelry I made for her. Do you remember Shrinky Dinks from when you were a kid? Well, they've grown up! They now make Shrinky Dinks for use with rubber-stamps. They even make some for use with ink jet printers.
The jewelry was done on the kind for rubber-stamps. It has a slick side and a rough side. I stamped Missy the kitty stamp on the rough side of the Shrinky Dink sheet. I colored Missy using regular colored pencils. Missy is supposed to be lavender with a pink collar, but the lavender came out more gray than lavender. I drew an oval around each stamped image using my shape cutter template, colored a lavender and pink line around each oval and then cut them out. (I couldn't use my shape cutter because it wasn't strong enough to cut through the thick plastic) I then punched a hole, using a large hole puncher, at the top of each piece. (be sure to do this before you shrink them, because once they're shrunk you won't be able to) They then were place in the oven on a pie pan. It took about 3 minutes to shrink. Very simple and fun.
The jewelry was done on the kind for rubber-stamps. It has a slick side and a rough side. I stamped Missy the kitty stamp on the rough side of the Shrinky Dink sheet. I colored Missy using regular colored pencils. Missy is supposed to be lavender with a pink collar, but the lavender came out more gray than lavender. I drew an oval around each stamped image using my shape cutter template, colored a lavender and pink line around each oval and then cut them out. (I couldn't use my shape cutter because it wasn't strong enough to cut through the thick plastic) I then punched a hole, using a large hole puncher, at the top of each piece. (be sure to do this before you shrink them, because once they're shrunk you won't be able to) They then were place in the oven on a pie pan. It took about 3 minutes to shrink. Very simple and fun.
Hand-Stamped Jewelry

This is a set that Marsha made for me as a gift. They feature one of my favorite rubber stamps, Missy of Hot Potatoes fame.
I am curious as to exactly how she made them, as I'm interested in doing some stamping on materials other than paper. So, I have scanned in and posted the picture here, and Marsha will come by later and tell us how she made them.
Thanks, Marsha! :-)
Monday, January 10, 2005
Christine's Baseball Scrapbook: Part Two

Click HERE for larger image...will open in a separate browser window.
As with the previous layout, I used papers, cardstock and stamp pad ink from Close To My Heart®. The baseball player stamp is from Stampin' Up!®
The Slugger Chips embellishments were made by scanning in real ones, making them the same size as the real ones, printing them on glossy cardstock, cutting them out, and running them through a Xyron® machine to make stickers.
The large letters were cut out using the Fiskars Shape Cutter and the alphabet template set. Although it takes a little practice to get the hang of using this tool,. once you do, you will find it an affordable alternative to alphabet punches of similar size. Fiskars also makes many other templates for use with this tool.
Stay tuned for Part Three! :-)
Friday, January 07, 2005
Christine's Baseball Scrapbook: Part One

Click HERE for larger image...will open a separate browser window.
This is the first completed layout for the infamous baseball scrapbook that I have been talking about for so long. These pages are devoted to a local professional team called the North Shore Spirit.
In addition to photographs that I took at the ballpark last summer, I have also included ticket stubs, a copy of the wallet-sized schedule, (losing) raffle tickets for game-worn jerseys, and even a seating chart with an arrow showing where our season ticket seats are located. Although I first tried printing the seating chart out on white cardstock, I decided I liked it better on the vellum.
All paper used here, with the exception of the red cardstock, is from Close To My Heart®. I am using a Level 2 kit called "At The Game", you will see more of the nifty background & texture papers in this kit as I progress with the book. The rubber stamps are from Stampin' Up!®. The punched-out letters were made with this punch set from Marvy Uchida.
Another nifty tool that I'm getting hooked on is the Fiskars® ShapeCutter. It takes a little practice to learn to use it, but once you, do, it is so very cool! I used it here to cut out the oval shaped photos.
I have really lousy handwriting, so once again I opted to computer-generate my journaling.
And yes, that is me standing next to the team bus! :-)
Stay tuned for more from this book! So far, I am having a lot of fun doing it! :-)
Tuesday, January 04, 2005
Candles
 While looking for candles for my "Cat with Wings" I remembered a candle shop I had been to before. I had taken my daughter there when she was looking for floating rose candles to use, in glass bowls, as wedding decorations on the tables at her reception. She found some very nice floating candles at a very decent price.
I needed votives for the Cat and checked them out. The shop is General Wax and Candle Company. Their scented votive are 55 cents compared to $1.50 they sell them for at Y@ankee C@ndle Co and $1.40 at W!cks N St!cks. And way less expensive than those "home party" candles. They're just as nice if not better.
I found out they have an affiliate program where I can put a link on my website to there site. I will earn cash for every order that's placed to them through my link. So if anyone is looking for some great candles or candle making supplies, you will find the link to General Wax and Candle Company, over to the left. Please go over and check them out.
And for all of the Krafty Kitties, what ever money that is made through the link from this blog, I will be sharing with all of us. So send your friends over. If anyone knows any Krafty Candle makers, they have great candle making supplies and frangrance oils, so let them know.