Sunday, January 23, 2005
I'm A Damsel in Distress!

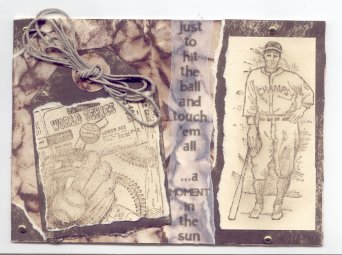
I've been watching that Tim Holtz DVD a lot lately, and I had already bought a few colors of his Distress Inks...right now I have Walnut Stain, Tea Dye, and Vintage Photo. Finally, I decided to try some of his techniques for using these inks, and you're looking at my first effort! I used Walnut Stain for this card.
First, I made a card from cream-colored cardstock, and cut it to fit a 5 1/4" x 7 1/8 clear envelope. The card needs to be cut slightly smaller, because it gets thicker with all of the layers, and you want to make sure that it will fit into the envelope!
I cut another piece of the same color cardstock a little bigger than the front of the card. To distress it, Tim says to first slightly bend the cardstock, and sort of pinch it *to break the tension*. Then it will be much easier to crumple it in your hand.
I didn't have the non-stick craft thingy that Tim used, but I did have parchment paper, the type used for cooking and baking. It's nonstick and can take the heat, and you can buy it at the supermarket. So I uncrumpled the cardstock, put it on the parchment, and spritzed it with water (in this house, we call it The Squirt Bottle of Justice™ , and it serves double duty by keeping naughty kitties off of the craft table!).
Then, I ironed it. Although my policy on clothing is that if I have to iron it, I don't wear it, I DO own an iron with a nonstick surface. I dug it out just for this project. Tim used a smaller *craft iron*, but advised that if you do use a regular iron, make sure to clean it before using it on your clothes. I set my iron for a low setting (mine was set halfway between Silk/Rayon and Permanent Press), and no steam is needed...the paper is already wet enough.
Once this distressed cardstock was ironed and dry, it was cut to the exact size of the front of the card, and adhered to it.
On more of the same cream cardstock, I stamped the baseball player (Stampin' Up!®) and the baseball collage stamp (Paper Inspirations™), with the Walnut Stain. Tim uses a stipple brush over the image after stamping to help create an aged effect, but I don't have one, and was not about to go to the craft store to get one, what with three feet of snow on the ground. A makeup sponge, such as those wedge-shaped ones, works just as well. The stamped images were then cut/torn as you can see here.
The tag was cut out of the cream cardstock, using the Fiskars Shape Cutter & a tag template. The mat behind the baseball player was also from the same cardstock. To *distress* these, I just rubbed the ink pad directly to the paper...no crumpling or ironing needed for this part.
Finishing touches: two corners made from the same distressed cardstock as the tag...some gold brads and some tan-colored hemp (both from Close To My Heart®). The text was computer-generated onto vellum and attached with a Xyron® machine. In fact, just about everything was attached with a Xyron® machine!
The text is part of the lyrics to one of my favorite songs, "Centerfield", by John Fogerty.
This was fun, and now I want to buy all of the colors of this cool ink! :-)


