
Tuesday, November 30, 2004
A Book of Extraordinary Cats
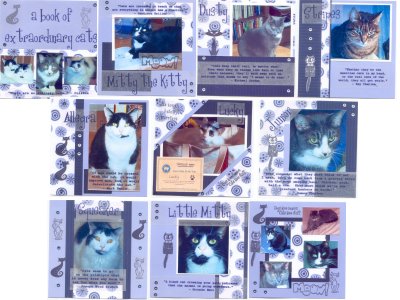
This is a 10 page 6 x 6 scrapbook that I made for my mother-in-law for a Christmas gift. We figured that she would like to have pictures of the grandcats! :-)
The cover of the album, not shown here, is navy blue.
The book was made from a kit from Close To My Heart®. The cats' names and journaling were printed onto vellum with the computer printer.
I decided to use cat quotes from a book called 516 Sensational Cat Quotes, Proverbs, Quips and Jokes for Scrapbooking, Crafting and Fun, for the journaling. I also used some of my smaller kitty rubber stamps (from various sources) to embellish the pages.
6 x 6 scrapbooks are fun, and can easily be assembled in an evening. I think they would make excellent, inexpensive holiday gifts.
To see the whole book in approximately actual size, click on the graphic above. This will open in a separate browser window.
Monday, November 22, 2004
Mr. Snowman
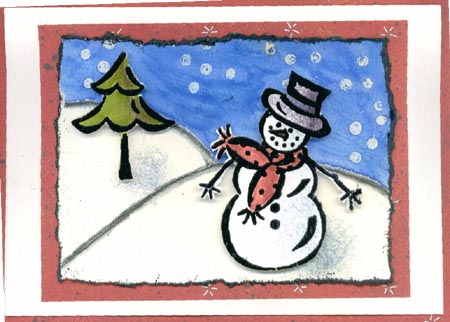
This is my first attempt at a Christmas card. The snowman, tree and snowflakes are from a Close To My Heart™ stamp set called "Mr. Snowman" I rubber-stamped the snowman and tree with clear embossing ink, added black embossing powder and embossed with a heat gun. After embossing I added color from my ink pads using a blending pen. I then cut them out. The background I did freehand with watercolor paint. First I embossed the snowflakes with clear embossing ink and powder then I added lines for the hills using black watercolor paint and then embossed. After embossing, I watercolored paited the sky. The paint doesn't stick to the embossed snowflakes. I tore the white paper and then embossed the edges with black. I then used Dimension Dots on the tree and snowman, to add dimension, and attacked them to the background. I sponged ink for the shadows. Then the whole thing was attached to a piece of red paper, which was then attached to a white card. The red paper behind the card was just place behind it in order for the card to show up on the white background of my scanner.
Saturday, November 20, 2004
We Have a Question
Because of a fiasco (on my part) trying to make some changes here at Krafty Kitties, I ended up deleting all our previous comments. I deleted more than comments, but with much thanks to Christine, she was able to recover my blunder.
Before all the comments were deleted, a question was asked by Deb. So sorry Deb, that I deleted your question before it was read by the rest of us.
So...without further ado...here is Deb's question:
"Christine, Just a general scrapping question... What types of adhesives do you prefer? Anyone else can feel free to answer as well.... I am not totally happy with what I am currently using and I am looking for some new opinions... :)"
I hope someone will be able to answer Deb's question.
Thursday, November 18, 2004
Meow
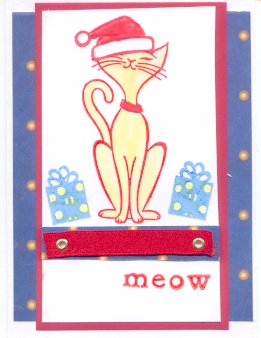
Our furry friend, Missy, from Hot Potatoes is back, and here she is showing her holiday spirit. The Santa hat stamp is also from Hot Potatoes, and it is designed to fit on any of their dog or cat stamps.
First, I stamped the hat onto glossy white cardstock. Then, I made a "mask" by stamping the hat again on a Post-it note, making sure that at least part of it was over the sticky area. This "mask" was then cut out and stuck over the stamped hat on the card. Using a stamp positioner, I stamped Missy in the correct place, removed the mask, and voila...Missy is wearing the hat! This was then heat-embossed and colored in.
The gift stamp is from a set called "Celebrations" from Close To My Heart®. Undernesth the stamped images, I attached a strip of blue paper and some red ribbon with two gold eyelets. I stamped "meow" underneath that, with an alphabet set called "Storytime", also from Close To My Heart®.
This was then attached to red cardstock, and then to more of the blue paper, and finally, to a white card.
Meow!
Wednesday, November 17, 2004
Feline of Christmas
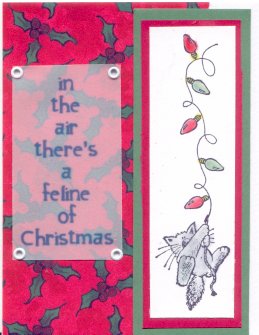
Yet another Christmas card! Years ago, I had store-bought cards that said "in the air there's a feline of Christmas". I thought that this was cute so I decided to make my own.
The image is actually two separate stamps. The kitty stamp (All Night Media) actually has a heart-shaped balloon from with the cat is hanging. I just inked the part of the stamp with the kitty holding the string. I then used a stamp postioner to stamp the string of lights (Rubber Stampede). Both of these stamps are easily available at chain stores such as Michaels, which is where I bought them.
The text was printed via the computer onto vellum. One 8 1/2 x 11 sheet of vellum is enough for nine cards. The background paper is pre-printed scrapbook paper.
Monday, November 08, 2004
Feline Navidad

The kitty and mouse image is called "Feline Navidad" and it comes from House-Mouse Designs. I am pretty sure that I own every single rubber stamp that they make that has a cat on it!
This was stamped onto white cardstock with black pigment ink and heat-embossed with clear embossing powder. I then colored it on using various ink pads and markers, using a Dove blending pen. This is a nifty tool that I learned about at a workshop at The Stamp Lady, a very cool rubber stamp store in my area.
You can use this with a stamp pad by just brushing the tip of the pen onto it. To use a marker with this, just use the marker on a surface such as the inside of the stamp pad lid, then dip the blending pen into that. Always test on scrap paper before applying to your project, just in case it is too dark.
I mounted the colored image onto a piece of red corrugated stock that came in a package of holiday scrap paper that I bought at Michaels. This was then mounted onto a piece of patterned paper from the same scrap pack, and then to a piece of red cardstock. Finally, it was all attached to a white card with red eyelets.
Portland Head Light at Christmas

This is an actual lighthouse that is located in Cape Elizabeth, Maine, right out of Portland. The stamp comes from that fine purveyor of cool lighthouse (and other) stamps, Repeat Impressions.
Three shades of grey cardstock were used here. I stamped the lighthouse image onto the darkest grey with black pigment ink. I then very carefully applied clear embossing powder to the Santa & reindeer part, and silver *tinsel* embossing powder to the rest of the image, then heat-embossed it all.
But I sort of screwed up and got a few small black smudges on this image, so I covered them up by drawing a moon and stars/snow/whatever, and heat embossed them with the same silver powder.
I adhered the image to the lightest grey cardstock. I then used embossing ink to hand-draw a boarder on the medium-grey card, and used the same glittery powder to heat-emboss that. Finally, I mounted the matted image to the card with silver brads.
Here Comes Santa Claws

Both stamps used for this card are from Repeat Impressions. The kitty was stamped onto white cardstock, heat-embossed, and colored in using various ink pads and markers, using a Dove blending pen. I cut the kitty out in the shape of a circle, and then cut out a slightly larger brown circle, to which I mounted the kitty.
I mounted a piece of torn scrapbook paper to a cream-colored card. If you look closely, you may be able to see that the paper says "Merry Xmas and Happy New Year". I then stamped the sentiment onto a torn piece of vellum, and mounted this to the card. The kitty picture was mounted to the card using two-sided foam tape, to make it pop up a little bit.
Finally, I glued some red glitter to the kitty's Santa hat for a finishing touch.
Happy Holidaze

The kitty and mouse image is called "Kitty Snuggle" and it comes from House-Mouse Designs. It was stamped onto what cardstock and heat-embossed, then colored in with various ink pads and markers, using a Dove blending pen. The letters that spell out "Happy Holidaze" were made by using an alphabet punch set by Marvy Uchida.
It needed a little more something on the sides, so I stamped the little tree, present and ornament. These stamps are part of a set called "Celebrations" from Close To My Heart®