
Thursday, August 26, 2004
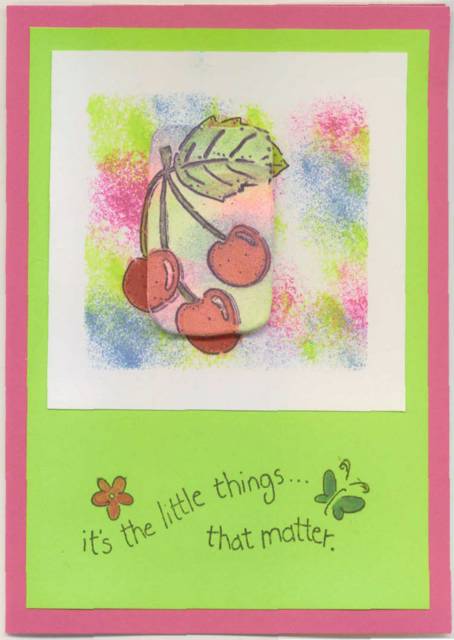
Life Is A Bowl Of Cherries
This card was made for the Close To My Heart® catalog show, Christine mentioned in the last post. Actually, it's a "Show and Tell" show. Patti is a CTMH consultant and has a group of us who each host a show one month out of the year. Christine is the hostess for this month's show. I was the hostess for last month's show. Since Christine is too far away from Texas, where the actual "in person" show is going to be, she will be hosting a catalog show. I was fortunately visiting in Texas for my month and was able to have a "live" show, otherwise my show would have been a catalog show as well. For the "Show and Tell" show, we all were to create something using CTMH products and we will share them with the group. Christine and I sent our items via e-mail. Patti will be sending us pictures of the items the other members of our group have created.
This card was made using CTMH card stock and inks in the Summer Celebration set. I used Watermelon cardstock for the body of the card and the background border is Citrus Leaf cardstock.
The stamp is a CTMH stamp called "Cherry Bunch". I sponge inked behind the Cherry Bunch, on white cardstock,using Watermelon, Citrus Leaf and Dutch Blue. I stamped the cherries and then colored them in, using a blending brush, with Cranberry and Citrus Leaf inks. The words are stamped from a CTMH set called "Little Things Matter".
I sponge inked onto a precut piece of Sculpey® clay, smaller than the original "Cherry Bunch" stamp, using Watermelon, Citrus Leaf and Dutch Blue inks, then stamped the "Cherry Bunch" onto the clay. I colored in the cherries, with Cranberry and Citrus Leaf inks, using a blending brush and by stippling the ink with a paint brush. Then baked the clay. Once it was cool I then attached the clay piece to the card using glue dots.
If I was to do this technique again, I wouldn't use the Sculpey® clay. The ink doesn't dry on it after it's baked and if you put the ink on before it's baked, the colors fade. Also, I tried to put a glaze on the clay to give it a bit of a shiny look and the ink bled. I think next time I will use the Makins® no bake clay or something similar.
Sculpey® is a great product and I use it for a lot of other craft projects, but it just doesn't work well for rubber-stamping.

Monday, August 23, 2004
Unashamed Felinity

This card was made especially for the Close To My Heart® catalog show that I am hosting for Patti this month.
I decided to go monochromatic here. Basically, I made the card from the dark stock, and cut it to fit the envelope I wanted to use. Then the striped B&T paper was attached. I used white eyelets at the corners here.
On more of the same cardstock, I stamped the fish bones, mice, yarn, and *Meow*. These were cut out with decorative scissors and adhered to the card.
On a lighter, coordinating piece of cardstock, I stamped the cats and the pawprint, as well as the words. These were cut out and attached to the front of the card.
The inside...

For the inside, I used the same B&T paper to print, on the computer, the part of the song from Andrew Lloyd Webber's "Cats" that insipred the *unashamed felinity* thing.
All stamps, inks, eyelets and papers are from CTMH, with the exception of the *Handstamped by Christine* stamp on the back. That one came from Repeat Impressions. It goes on every card I make!
Tuesday, August 10, 2004
Mewsic

This card will accompany a CD that I burned for a friend. The kitty and mice at the piano stamp is from House-Mouse Designs. It was colored in using colored pencils and soft chalks, and glued to the card.
The alphabet is "Contempo Serif Lowercase" from Close To My Heart®. The music notes all come from one stamp...I stamped a few and cut them apart here. The music notes stamp comes from Rubber Stampede, and I bought it at Michaels.
Another *Maine-iacal* Card
Similar to this one...

See the above-linked post for technique and stamp sources. Repeat Impressions is the best source for Maine lighthouse stamps. The big one is Portland Head Light, top right is Nubble Light in York Beach, and the small one is Spring Point Light, in Cacso Bay off of Portland.
See the above-linked post for technique and stamp sources. Repeat Impressions is the best source for Maine lighthouse stamps. The big one is Portland Head Light, top right is Nubble Light in York Beach, and the small one is Spring Point Light, in Cacso Bay off of Portland.
Red Hat Cards


Here are two cards with a Red Hat Society® theme.
Both of these cards use a technique called *masking*. It is a way that you can integrate different stamps into a design.
First, pick the image you want to be in the forefront, and stamp that onto the paper, cardstock, whatever. Then, use this same stamp and stamp the image again onto a Post-It® note, with part of the image on the part where the adhesive is. This is your *mask*, and the adhesive from the sticky note will keep the mask in place.
Now, choose the next image...in this case, that kitty. Position the mask exactly over the stamped image, and then stamp the kitty where you want it. A stamp positioner tool is invaluable for this, and it will pay for itself because of all the paper you don't have to throw out because you screwed up.
Remove the mask, and you see that the kitty is covered with the hat!
I keep a folder with pages with my masks stuck on them, so I don't have to make new ones every time I want to use the same stamp. Eventually, you do have to make new ones, but once made, a mask is good for quite a few uses.
The kitty stamps are from a set from Close To My Heart® called "Meow!". The alphabet stamps are also from Close To My Heart®, Comtempo Serif Lowercase (acrylic). The hat stamp is from Rubber Stampede®, and was purchased from Michaels.
Thursday, August 05, 2004
Peace Around The World

This card was made exclusively with products from Close To My Heart®. The stamp is called "Peace Around The World", and I believe it has been retired...glad I was able to grab it before it went bye-bye. The "Thinking of You" sentiment is part of a set called "Cheerful Thoughts", which is still available. The stamp pad ink is "New England Ivy".
Close To My Heart® does make it easy, with their coordinating papers and cardstocks!
I just used the solid cardstock to make the card, and glued on the striped paper. I stamped the image onto a very light green paper with black ink, and used soft chalks to color it in. Then I just used more solid color cardstock to mat the image and the sentiment, and glued it all onto the card.
A *Maine-iacal* Card!

When I was working on this card, I had stamped and colored in the lobster and lighthouse images that you now see on this card. They didn't look right on the particular card I was was working on, but since we Yanks are known for our thriftiness, I did not throw the pictures away. Yes, the lighthouse stamp is the same one used for the other card...I think it is fun to see all the ways one can use the same stamp!
So I decided to use a few more of my newly-acquired Maine stamps to make this card. The images were all colored in using soft chalks and colored pencils, then trimmed and matted on red cardstock. I made a card from light grey cardstock and glued the marbleized paper (from the infamous "The Slab" mentioned in my last post) over it. Then I just played around with arranging the images on the card, and glued it all down once I was happy with it.
The lighthouse, moose family and lobster stamps are all from Repeat Impressions. The state of Maine outline and the signpost stamps came from Silver Fox Stamps.
What does that signpost have to do with Maine? Well, it is IN Maine...Lynchville, in Oxford County, to be exact! There are a jazillion little towns in Maine that are named after various foreign countries, and all of the ones on that signpost really ARE in Maine!
Thank You Card

Missy and Bandit from Hot Potatoes are back! Here, they were stamped with an embossing ink pad, and heat-embossed with copper-colored embossing powder.
For the card, I used a pre-made ivory-colored card, to which I attached two types of decorative paper. I used an alphabet from Close To My Heart® called "Contempo Serif Lowercase" (acrylic) for the "thank you" sentiment. This was also stamped and embossed the ssame way as the kitties. Finally, the kitties were matted onto brown cardstock and attached to the card.
The striped paper is also from Close To My Heart®. Any other patterend papers that you see in my projects that are NOT from CTMH likely come from a giant pack o' paper called The Slab, which can be purchased at your friendly neighborhood Michaels craft store.
I think I will send this card to Patti Zackular, the woman who takes care of our kitties while we go on vacation.
Wednesday, August 04, 2004
Baseball Card!
I'm on a roll here!

I made this card for the staff of one of my favorite baseball teams, the North Shore Spirit. We purchased a season ticket mini-pack for this year, and we have been treated VERY well by any and all Spirit staff members we have dealt with. They have actually gone so far as to personally deliver my season tickets to my home, when they had a delay with the printer who was supposed to be printing them up...they wanted to be sure we had our tickets in time for the first game!
This franchise is only in its second season, but they are doing an excellent job. I just wanted to thank them for it, and for making our trips to the ballpark a pleasant experience.
How to make a card like this:
1. Make card of desired size from grass-green cardstock.
2. Cut baselines and bases from white cardstock. Attach to card. The bases were attached using those pop-dot thingies, a glue pen is best for the skinny little baselines.
3. Stamp ballplayer onto white cardstock, mat onto blue cardstock. I colored him in with colored pencils, using Spirit colors, of course! Cut diamond from red cardstock, glue to card, then glue ballplayer image on top of that.
4. Stamp "Thank You" and "Home Run" onto white cardstock, cut out and mat onto red cardstock, attach to card.
The ballplayer and "Home Run" stamps are from a set from Stampin' Up!® (which has been retired, I got mine from someone on EBay. The "Thank You" stamp is from a set from Close To My Heart®.
Nubble Lighthouse Card

Hi everyone...it's been ages since I've posted anything here...been busy with vacation and stuff. But now I'm back, and while I was gone, I visited TWO rubber stamp stores in Maine. The stuff was nice and money was spent!
This card depicts the Nubble Lighthouse, in York Beach, Maine. The stamp can be purchased at either of the two stamp stores I visited (Maine-ly Stamps in Kittery and Stamps & Stuff in Freeport), but it can also be ordered directly from Repeat Impressions, a rubber stamp company in Freeport, Maine.
At first I experimented with coloring in the lighthouse scene...it looked nice, but not what I had in mind. So I decided to keep it simple, just shades of blue, grey, and white.
Here's how...
1. Make card from medium-grey cardstock.
2. Cut decorative paper to fit, adhere to card.
3. Stamp lighthouse onto white cardstock with embossing ink, apply pearl blue embossing powder, emboss using heat gun.
4. Cut lighthouse image to desired size and mat onto darker grey cardstock.
5. Affix this to front of card.
This card is intended to be a *thank you* card for the hosts at the place where we stayed while on vacation. I hope they will like it!
More cards from me coming soon! Stay tuned! :-)