Tuesday, February 01, 2005
The Way Life Should Be

As usual...click image for supersized version!
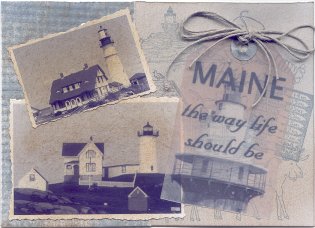
Another project featuring the wonderful Tim Holtz Distress Inks. This one uses the colors of Weathered Wood and Vintage Photo. The Weathered Wood ink color has a nautical feel to me, and I wanted to use it for a Maine theme. So here it is!
The lighthouse photos were taken by me. I used Paint Shop Pro to convert them to black & white, and then printed them out on photo paper on my home printer. Using a color duster brush, I applied both the Weathered Wood and Vintage Photo inks to the pictures to give them that "oldified" (as Mike called it) look.
I remember old photo albums, where the pictures always had borders and sort of a deckle-edged cut, and I tried to re-create that here.
All paper used here is the same light grey cardstock. I started by making the actual card, and then stamped it with a series of Maine-related stamps that I own, using the Weathered Wood distress ink. I then used the color duster brush to add a little more ink, in both the Weathered Wood and Vintage photo.
For the blue panel on the left-hand side, I simply applied the distress inks directly to some of the grey cardstock. I then ran it through my newest toy, a paper crimper, both horizontally and vertically. I cut it to size, tore it on one side, and stuck it onto the card.
The tag is made of vellum. I have wondered what it would look like, to print a photograph onto vellum, and I finally found out. I selected this picture that I took of Spring Point Lighthouse, and used Paint Shop Pro to convert it to sepia tone. I then used Gamma Correction to lighten it a bit. I copied and pasted this to a new image that was about the size of the tag template, added the text, and printed it onto the vellum. I used the tag template for the Fiskars Shape Cutter to cut out the tag...this template also includes circles for the tag holes. This circle was cut froom a scrap of distressed grey cardstock that did not go through the crimper. I added the string bow, ran the whole thing through the Xyron®, and attached it to the card last, after the photos.


